| Banana & Walnut Loaf with Cinnamon Butter |
[view]
|
Similarly tagged posts
- No Related Posts
Breakfast is one of my favourite meals of the day. It’s when I get to sit by myself enjoying the (hopefully) quiet morning & think through my day before things get busy. A healthy & filling breakfast is very important. This is one of my favourite recipes. It fills you up, it’s not too sweet & it’s delicious! It also freezes particularly well. Bananas are a good source of potassium, vitamin B6 & vitamin C (though this last one is probably lost during cooking). Walnuts are a wonderful vegetarian source of omega-3 fatty acids & have been known to lower cholesterol. Bonus!
—
Banana & Walnut Loaf
- 3 Bananas (the very ripe ones are best)
- 2 Free Range Eggs
- 3/4 cup of Soft Brown Sugar
- 2 cups Plain Flour (go for the organic kind!)
- 1 cup chopped walnuts (I buy ones grown in Australia as opposed to those shipped from California)
- 2 tablespoons vegetable oil
- 1 teaspoon bicarbonate soda
- 1 teaspoon ground cinnamon
- pinch of salt
In a large bowl combine the peeled bananas, oil & the two eggs & mash to your hearts content. Sift in the flour, bicarbonate soda, cinnamon & salt. Add the walnuts & sugar & mix till combined. Pour the mixture into a greased 21cm x 11cm baking tin a bake in a preheated oven at 180 degrees celcius for one hour. Remove from the oven an cool out of the pan. Or alternatively, eat it straight away because it tastes best when fresh ftom the oven! Serve warm with butter or cinnamon butter.
—
Cinnamon Butter
- 2 table spoons Soft Butter or table spread (Nuttlex anyone?!)
- 1 tablespoon Soft Brown Sugar
- 1/2 teaspoon cinnamon
Mix together till smooth & creamy. Enjoy!
This post was written by Bella (contact) on March 4th, 2009 at and was filed under Tasty Foodstuffs and tagged with the words Banana, recipe, Tasty Foodstuffs, Walnut . It contains 269 words, 4 images.
| DIY Manicure + Recipes! |
[view]
|
Similarly tagged posts
- No Related Posts
Before you begin, you will need to assemble a few items. You can pick up most of these from the pharmacy, supermarket or places like Priceline for a reasonable price. Alternatively, you could scour department stores, or online for a manicure set, or a manicure and pedicure set. Some come with just the basic tools, while others include battery powered buffing tools & even powered drying stations for nails wet with polish! They aren’t necessary of course, & you can give yourself a perfect manicure at home with just the items I have listed here. For the recipes on the other hand you might need to brave the local health food store - or try the folks at Sydney Essential Oil Co.
What you’ll be needing:
Towels
Acetone or Nail Polish Remover
Alcohol or Sanitiser
Bowls
Warm Water
Emery Board or Nail File
Buffing Board
Nail Clippers or Scissors
Orange Stick or Cuticle Pusher
Square Tipped Brush
Nail Polish
Set up your space, ideally close to basin. Place the nail clippers & orange stick in a cup or mug with a small amount of alcohol poured into the bottom to disinfect & sanitise. When you’ve finished your manicure it’s important to remember to spray the emery board & the buffing board (& any other tools) with disinfectant and give them a wipe down. You & your hands a really important so don’t expose either to nasty bacteria & risk giving yourself an infection!
1. Clean Hands
First things first, remove old nail polish with nail polish remover or acetone, & some cotton balls. Personally, I don’t buy nail polish remover any more. I go to the hardware store & buy a big bottle of acetone, which is basically the primary ingredient in nail polish remover anyway. Some people find that it can be drying, but I haven’t had any problems so far - especially since I make a point of moisturising afterwards. It works out to be so much cheaper as well & there’s less packaging to deal with. Make sure your hands are clean & wet the cotton ball with a small amount of acetone & hold over the nail for a few seconds. Then wipe away the polish with one or two firm, slow strokes and move on to the next nail. Use the pointed end of the orange stick to clean out dirt from underneath the nail.
2. Exfoliate
Mud Cake Hand Scrub
30g Organic Coco Butter
30ml Organic Almond Oil
20ml Vegetable Glycerin
30g Organic Coco Powder
60g Raw Organic SugarMelt the coco butter in a bowl in the microwave. As coco butter is quite hard & can be stubborn, it’s best to try microwaving it for a minute at time until it has fully melted. Once the butter has melted, add the other ingredients & give it a good stir. I find its best to use while warm, as the mixture will thicken up as it cools. To use, place about a tablespoon of the mixture in the palm of one hand & rub both hands together, scrubbing the backs of the hands, in-between fingers, & up towards the nails. Coco butter moisturises, while the sugar exfoliates meaning this scrumptious scrub makes hands soft & lovely, but even better than that, it smells divine. Just like chocolate mud cake! Délicieux! Wash away the scrub with warm water & pat hands dry with a towel.
3. Clip & File
Now it’s time to clip and file our nails. I don’t usually cut or clip my nails unless they’re really uneven & I recommend you do the same. Excessive clipping or cutting can make the free edge of the nail weak & it can sometimes cause tearing or split nails. Take the nail file and slide it along the free edge of your nail from the out corner to the centre. Don’t file in a see-saw or back & forth motion, as this will also weaken the nail. Instead file in just the one direction, from corner to centre & then start again from the other side of the nail, first with the rough edge of the nail file & then with the smooth edge. The purpose of filing your nails is to smooth over & even out the free edge of the nail. The ideal shape for filed nails is a rounded square - this shape is least likely to break, split or chip. If you like, you can go over the edged of your filed nails with the rough side of the buffing board to really smooth them out.
4. Soak
Time to soak! Soaking your hands in warm water is a lovely relaxing treat, but is only necessary if you plan to push back your cuticles.
Gingerbread Nail Soak
50ml Organic Liquid Castile Soap
10ml Organic Apricot Kernel or Almond Oil
3 drops Cinnamon Leaf Essential Oil
3 drops Ginger Essential OilUse a stirring rod or the handle of a spoon to gently stir the essential oils and apricot or almond oil into the castile soap, and store in a clean glass bottle. To use, mix between one and two tablespoons of the soak into a bowl filled with warm water & soak hands & nails for five to ten minutes to loosen cuticles. While cinnamon and ginger essential oils are good for improving circulation, they may irritate sensitive skin. However, you can easily substitute them for any other essential oils. I recommend lavender & geranium, or myrrh & vanilla, or even peppermint & lime! Got nuts and formulate your own! When your hands are done languishing in the warm water, take them out & pat dry with a towel.
5. Cuticles
Take the orange stick and use the flat end to gently push back the cuticles. This step isn’t necessary & its not something I do every time I give myself a manicure. Pushing back the cuticle gives your nail a neat & tidy look & makes nail polish application even, but if you’re not careful you run the risk of getting an infection. Especially if your cuticles are cracked, torn or bleeding. So be careful!
6. Buff
Buffing your nails smooths out the weak spots; ridges, cracks & chips. Smooth, buffed nails are less likely to break & your manicure will last longer. Take the buffing board & begin with the roughest edge. Use a little pressure & make small circular motions against the surface of the nail. Finish with a side to side motion & then use the finer edge of the board. The board I use is four sided, the sides are covered with buffing paper & each side uses a grade that is finer than the last. The first side is for removing ridges, the second for smoothing, the third for buffing & the last for polishing & adding shine. Don’t use the final side if you plan to apply nail polish as the polish tends to stick better to porous surfaces rather than glossy smooth ones.
7. Moisturise
Sweet Nut Hand Treatment
50g Honey
20ml Organic Macadamia Oil
20ml Organic Almond Oil
1 Vitamin E CapsulePour the honey into a bowl & warm in the microwave until runny. Gently stir in the macadamia & almond oils & then add the contents of the broken vitamin E capsule. Use while still warm by slathering the mixture all over your hands & then wrapping them up in a plastic bag followed by a hot towel. (Warm up your towels in the dryer, or by dampening them in a basin full of hot water) Then sit & relax! After five to ten minutes remove your hands & wash thoroughly in warm water. Honey is an excellent moisturiser & when mixed with the oils it is wonderful for soothing tired skin & leaving your hands soft & gorgeous!
8. Polish
Again like pushing back cuticles, applying polish is optional. Use a base coat or clear top coat first to seal the nail & prevent the coloured polish from leaving a stain. Très passé! Apply the polish in three even strokes, the first in the middle & then one either side. Stronger colours may need a second coat. Leave to dry & then apply a layer of top coat or clear nail polish for a lovely glossy look.
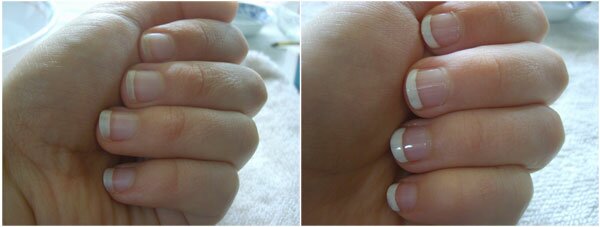
Keep your hands still for an hour or so to let the polish dry properly. You can use the time to read a magazine, watch your favourite film or chat with a friend.Voilà! You’re finished & your nails should look wonderful!
This post was written by Bella (contact) on January 14th, 2009 at and was filed under How To and tagged with the words Beauty, DIY, Do It Yourself, manicure, Natural, recipe . It contains 1,382 words, 8 images.
| The Gossip Girl Grilled Cheese Sandwich |
[view]
|
Similarly tagged posts
- No Related Posts
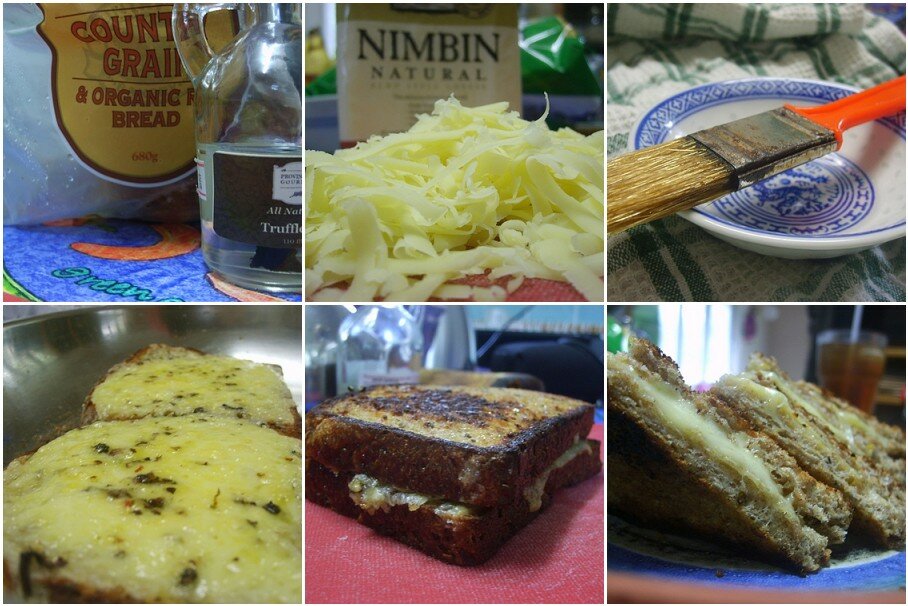
I first saw this delicious sandwich on the pilot episode of Gossip Girl. It’s a delicious twist on the traditional grilled cheese sandwich, the twist being truffle oil! The famous New York restaurant Gilt serves up their own version using fresh sliced white truffles, which sounds decadent enough, but is difficult for us everyday gourmands to put into practice. Truffles are notoriously expensive & definitely won’t keep as long in your pantry as a small bottle of truffle oil will. Besides, the Gilt grilled cheese sandwich will set you back $50! So not only is this sandwich fairly cheap by comparison, it is also easy to put together & is delicious! I think that at 3am it would make a perfect ending to a big night out!
In this recipe, I have used sliced grain bread, which is chewy & dense, is low in carbohydrates & has a low GI. I also used Nimbin Natural cheese, an Elbo style cheese that is free of animal rennet & one of the best tasting cheeses I have come across. You can find small bottles of truffle oil at most delicatessens’ but expect to pay as much as thirty dollars for 100ml.
Gossip Girl Grilled Cheese Sandwich
- half a cup of good quality freshly grated cheese
- two slices fresh grain bread
- butter
- truffle oil
- salt & pepper
Heat a small spoonful of butter in a frying pan over a medium heat & preheat your griller (broiler) or oven. Brush both sides of the bread with truffle oil using a pastry brush & then top both slices with the grated cheese. Season with salt & freshly cracked pepper & place each slice into the frying pan face up. Let the bread fry for one to two minutes & then transfer the frying pan to the grill or oven to melt the cheese. This shouldn’t take too long! Carefully remove the frying pan when done. Sandwich the two cooked slices together (cheese facing inward of course!) & cut in half. Enjoy while still warm & gooey!
This post was written by Bella (contact) on December 8th, 2008 at and was filed under How To, Tasty Foodstuffs and tagged with the words gossip girl, grilled cheese sandwich, recipe, Style, toasted cheese sandwich, truffle oil . It contains 333 words, 1 image.
| Tasty Tequila Temptations |
[view]
|
Similarly tagged posts
- No Related Posts
Last night my beau & I went to a Herradura Tequila Mixology Master-class held by a local chain of boutique liquor stores. I was terribly excited & a little bit nervous, as I’ve always heard nasty things about drinking tequila. My experiences in the past have been the usual lip, sip & suck kind so I was interested in learning more about tequila, its origin & how to serve it. Plus, we were promised food & drink!
A friendly & experienced bar tender by the name of Shay led the presentation & told us all about Herradura tequila, where it is from & how it is made. He also told us what to look for on the label of the bottle when buying tequila & the differences in taste & quality between brands. We tried three types of tequila, Herradura Anejo, Herradura Reposado & Herradura Silver. My favourite is the Silver! At the end of the night we were given a little bottle of el Jimador tequila to take home with us as well. Awesome! We also tasted a new cocktail, created by Shay. It is a variation of The Bramble, which was created by Dick Brandsell in the eighties. The original bramble is made with Gin, lemon, sugar & double crème de mure garnished with berries. I hope he doesn’t mind me sharing the recipe!

Photo by nerdling
Shay’s Herradura Bramble
- 45ml Herradura Silver Tequila
- 20ml fresh lemon juice
- 20ml simple syrup
- dash of Chambord liqueur
Pour the tequila, lemon juice & sugar syrup into a cocktail shaker half filled with ice. Shake Shake Shake! Serve in a glass filled with ice & top with a dash of Chambord. Enjoy responsibly, & hopefully with friends!
In this cocktail the bitter cherry notes found in the Herradura Silver tequila apparently marry very nicely with the modest addition of Chambord. I think its rather tasty & has sparked my new-found appreciation for tequila.
This post was written by Bella (contact) on November 27th, 2008 at and was filed under Fun, How To, Tasty Foodstuffs and tagged with the words Bramble, cocktail, Herradura, recipe, tequila . It contains 313 words, 3 images.
| Tasty Afternoon Treats; Tea-sandwiches & Pink Lemonade |
[view]
|
Similarly tagged posts
- No Related Posts
Amidst the lazy spring afternoons we’ve been enjoying, not much can beat deliciously light sandwiches and refreshing lemonade.

Cucumber Sandwiches
- Cucumbers
- Sliced sandwich bread
- Vinegar or lemon juice
- Butter or margarine
- Salt & pepper
Use a vegetable peeler, or a fork, to mark the sides of the cucumber. Finely slice & arrange in layer in a container. Sprinkle with white wine vinegar (or lemon juice if you prefer) & lightly season with salt & pepper. Let the container of cucumber slices sit in the fridge for several hours.
Remove the crusts from sliced sandwich bread. Purists argue that the bread must be white & must be sliced ever so thinly. I’m not that fussed, I like my sliced organic wholemeal thank you very much! Thinly butter the inward facing side of each slice of bread - this stops the bread from becoming soggy. Arrange the cucumber slices on one slice of bread, top with another & slice into tiny triangles or fingers. Enjoy immediately!
Watercress Sandwiches
- Fresh watercress
- Spreadable cheese (cream cheese, cottage cheese, neufchâtel etc)
- Sliced sandwich bread
When buying watercress, look for a healthy green plant. The roots should still be attached & submerged in cold water.
Remove the crusts from sliced sandwich bread & spread neufchâtel, cottage cheese, or cream cheese on the inward facing sides of each slice. Because of the peppery flavour if watercress, I like to spread one side with cream cheese & the other with a mild mustard. Roughly chop the watercress & arrange on one slice of bread & top with another slice of bread. Slice into dainty tea-triangles. Eat these as soon as possible!
Home Made Pink Lemonade
Mix the juice of one lemon (about 100ml) with 50ml of simple syrup. Add no more than a teaspoon of grenadine or raspberry cordial & top up with 400ml of soda water stirring gently. Serve in tall glasses with lots of ice & a paper umbrella!
What are your favourite afternoon treats?
This post was written by Bella (contact) on October 22nd, 2008 at and was filed under How To, Tasty Foodstuffs and tagged with the words afternoon tea, lemonade, recipe, sandwiches, spring, tasty . It contains 312 words, 3 images.
[ Bellas Threads powered by Wordpress | Website skin layout generated by Myspace Layouts. ]


